No matter what city you live in, chances are that your electricity bill is already through the roof. The only way to journey from hefty bills to free electricity for at least 25 years is by installing a rooftop solar system at your home. Which brings us to the question we get asked the most – what is the solar panel installation cost in 2025?
To set the record straight, it’s important for you to understand that the solar panel installation cost in India is not the same. It varies from city to city due to multiple factors (to be addressed a little later in this guide). For demonstration purposes, let’s take the example of two cities (one from North India and the other from South India) and discuss how much it would cost to install a 5 kW on-grid rooftop solar system:
- Estimated starting cost of installing a 5 kW solar system in Lucknow after you avail a subsidy: ~ Rs. 1,98,000*
- Estimated starting cost of installing a 5 kW solar system in Bengaluru after you avail a subsidy: ~ Rs. 2,92,000*
*Please note: These prices are indicative as of 29th April 2025 for SolarSquare Blue 6ft variant. Please note that the final cost of a 5 kW solar system in India depends on your city, DISCOM charges, product variant opted for, panel type, inverter type, mounting structure height, type of after-sales service, savings guarantee, roof height, etc.
This blog will journey through the cost of installing solar panels at home in 7 carefully chosen cities from different corners of India. The aim is to give you a decent idea of how much it would cost to install solar panels at your home. We’ll also spill the beans on how much solar subsidy you can avail!
Let’s get going!
Solar Panel Installation Cost in India in 2025 With and Without a Subsidy
The Indian government offers homeowners a subsidy for installing on-grid rooftop solar systems. Under the PM Surya Ghar Muft Bijli Yojana, this subsidy remains the same in all states.
Here’s a snapshot of how much solar subsidy you can avail in India:
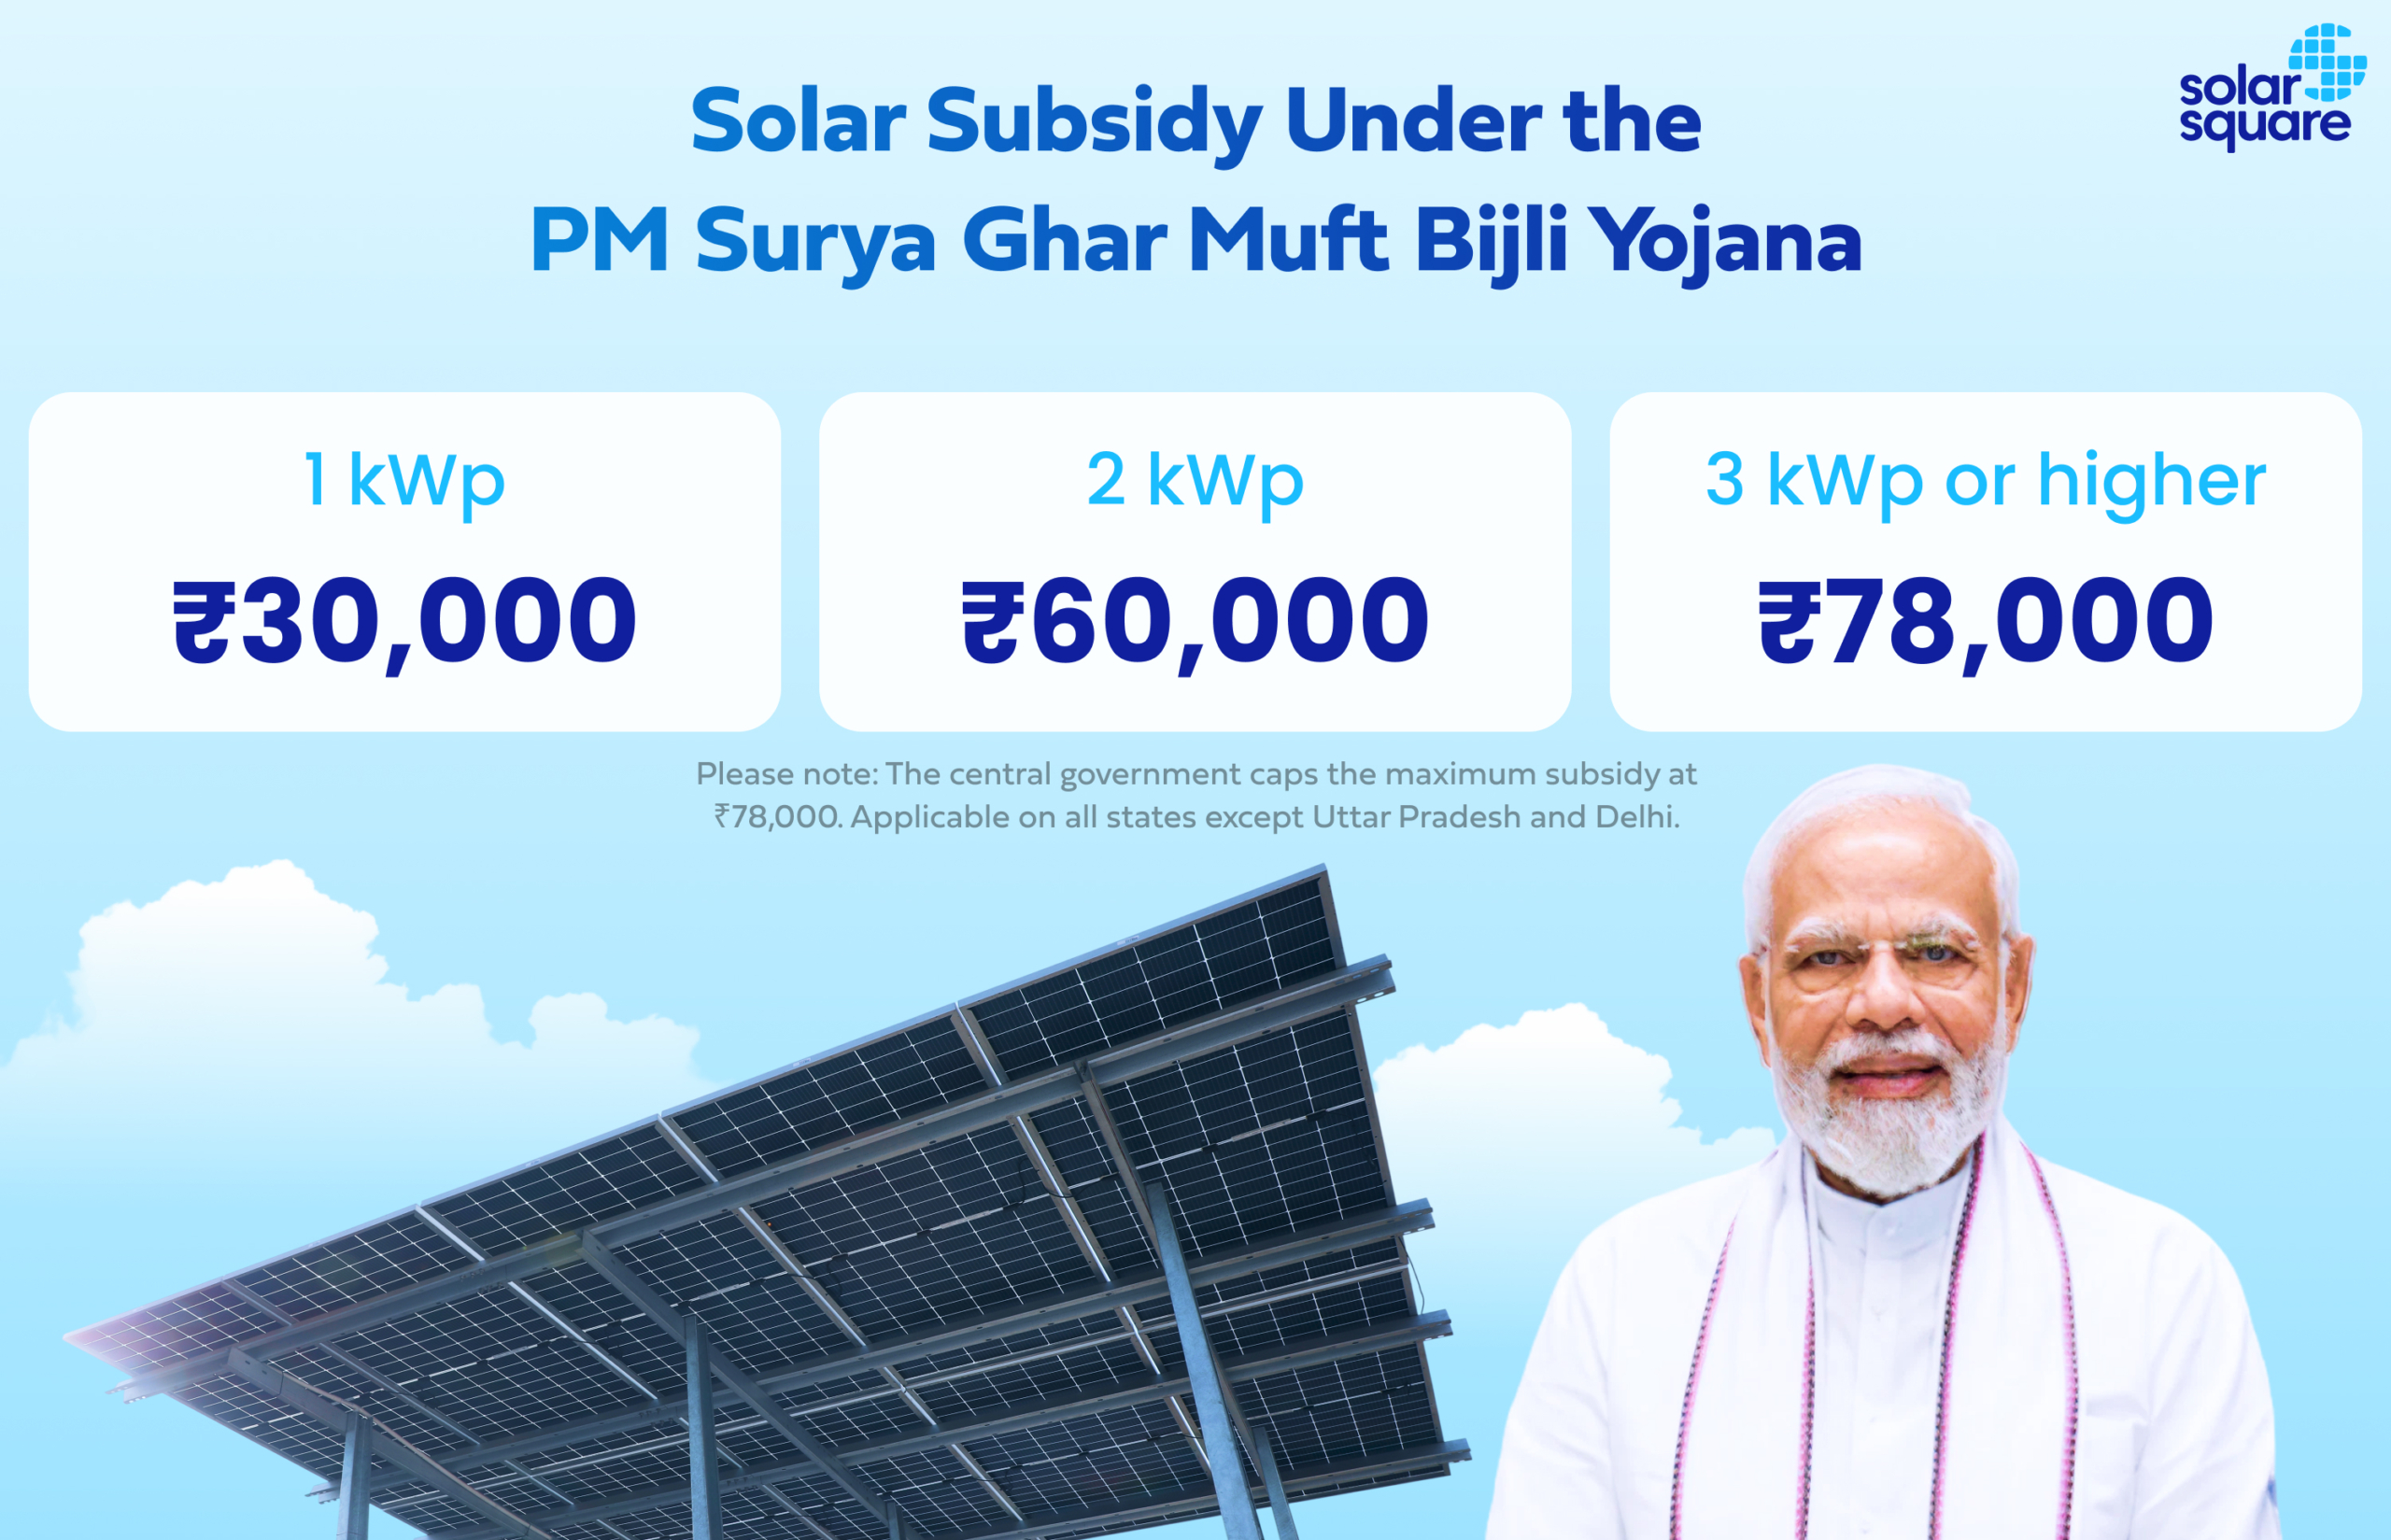
Please note: The central government caps the maximum subsidy to Rs. 78,000.
Solar Panel Installation Cost in Bhopal
Here’s a clear breakdown of the estimated cost to install solar panels in Bhopal with and without a subsidy.
| Solar System Size | Estimated Cost to Install Solar Panels Before Subsidy* (Starting price of base variant) | Solar Subsidy | Solar Panel Installation Cost After Subsidy* (Starting price of base variant) |
| 2 kWp | ~ Rs. 1,80,000 | Rs. 60,000 | ~ Rs. 1,20,000 |
| 3 kWp | ~ Rs. 2,10,000 | Rs. 78,000 | ~ Rs. 1,32,000 |
| 4 kWp | ~ Rs. 2,55,000 | Rs. 78,000 | ~ Rs. 1,77,000 |
| 5 kWp | ~ Rs. 3,10,000 | Rs. 78,000 | ~ Rs. 2,32,000 |
| 10 kWp | ~ Rs. 5,80,000 | Rs. 78,000 | ~ Rs. 5,02,000 |
*Please note: These prices are indicative as of 29th April 2025 for SolarSquare Blue 6ft variant. The final solar panel installation cost in India depends on your city, DISCOM charges, product variant opted for, panel type, inverter type, mounting structure height, type of after-sales service, savings guarantee, roof height, etc.
Solar Panel Installation Cost in Nagpur
The table below breaks down the cost of solar panels and installation in Nagpur with and without a subsidy.
| Solar System Size | Cost to Install Solar Panels on House Before Subsidy* (Starting price of base variant) | Solar Subsidy | Solar Panel Installation Cost After Subsidy* (Starting price of base variant) |
| 2 kWp | ~ Rs. 1,70,000 | Rs. 60,000 | ~ Rs. 1,10,000 |
| 3 kWp | ~ Rs. 2,05,000 | Rs. 78,000 | ~ Rs. 1,27,000 |
| 4 kWp | ~ Rs. 2,50,000 | Rs. 78,000 | ~ Rs. 1,72,000 |
| 5 kWp | ~ Rs. 3,00,000 | Rs. 78,000 | ~ Rs. 2,22,000 |
| 10 kWp | ~ Rs. 5,75,000 | Rs. 78,000 | ~ Rs. 4,97,000 |
*Please note: These prices are indicative as of 29th April 2025 for SolarSquare Blue 6ft variant. The final cost of solar panel installation for a home depends on your city, DISCOM charges, product variant opted for, panel type, inverter type, mounting structure height, type of after-sales service, savings guarantee, roof height, etc.
Solar Panel Installation Cost in Lucknow
| Did you know? The UP government offers an additional subsidy to homeowners installing on-grid solar systems at home. This state subsidy is on top of the central subsidy. |
Here are UP’s state subsidy details:
- Rs. 15,000/ kW for systems between 1-2 kW and Rs 30,000 for systems >=2 kW
- Maximum subsidy capped at Rs. 30,000
When you add this additional amount, the final subsidy in UP increases. Here are the details.
| Solar System Size | State Subsidy | Central Subsidy | Total Subsidy in UP |
| 2 kWp | Rs. 30,000 | Rs. 60,000 | Rs. 90,000 |
| 3 kWp | Rs. 30,000 | Rs. 78,000 | Rs. 1,08,000 |
| 4 kWp | Rs. 30,000 | Rs. 78,000 | Rs. 1,08,000 |
| 5 kWp | Rs. 30,000 | Rs. 78,000 | Rs. 1,08,000 |
| 10 kWp | Rs. 30,000 | Rs. 78,000 | Rs. 1,08,000 |
Now, let’s find out how much it would cost to install solar panels in Lucknow before and after a subsidy.
| Solar System Size | Solar Panels Installation Cost Before Subsidy* (Starting price of base variant) | Solar Subsidy | Solar Panel Installation Cost After Subsidy* (Starting price of base variant) |
| 2 kWp | ~ Rs. 1,80,000 | Rs. 90,000 | ~ Rs. 90,000 |
| 3 kWp | ~ Rs. 2,10,000 | Rs. 1,08,000 | ~ Rs. 1,02,000 |
| 4 kWp | ~ Rs. 2,55,000 | Rs. 1,08,000 | ~ Rs. 1,47,000 |
| 5 kWp | ~ Rs. 3,05,000 | Rs. 1,08,000 | ~ Rs. 1,97,000 |
| 10 kWp | ~ Rs. 5,80,000 | Rs. 1,08,000 | ~ Rs. 4,72,000 |
*Please note: These prices are indicative as of 29th April 2025 for SolarSquare Blue 6ft variant. The final cost to install solar panels on a house depends on your city, DISCOM charges, product variant opted for, panel type, inverter type, mounting structure height, type of after-sales service, savings guarantee, roof height, etc.
Solar Panel Installation Cost in Pune
Here’s a tabulated snapshot of the solar panel installation cost in Pune before and after a subsidy.
| Solar System Size | Cost of Installing Solar Panels at Home Before Subsidy* (Starting price of base variant) | Solar Subsidy | Solar Panel Installation Cost After Subsidy* (Starting price of base variant) |
| 2 kWp | ~ Rs. 1,75,000 | Rs. 60,000 | ~ Rs. 1,15,000 |
| 3 kWp | ~ Rs. 2,05,000 | Rs. 78,000 | ~ Rs. 1,27,000 |
| 4 kWp | ~ Rs. 2,50,000 | Rs. 78,000 | ~ Rs. 1,72,000 |
| 5 kWp | ~ Rs. 3,00,000 | Rs. 78,000 | ~ Rs. 2,22,000 |
| 10 kWp | ~ Rs. 5,75,000 | Rs. 78,000 | ~ Rs. 4,97,000 |
*Please note: These prices are indicative as of 29th April 2025 for SolarSquare Blue 6ft variant. The final solar panel installation cost in India depends on your city, DISCOM charges, product variant opted for, panel type, inverter type, mounting structure height, type of after-sales service, savings guarantee, roof height, etc.
Solar Panel Installation Cost in Delhi
Here’s how much it would cost to install solar panels in Delhi before and after a subsidy:
| Solar System Size | Cost of Solar Panel Installation for Home Before Subsidy* (Starting price of base variant) | Solar Subsidy | Solar Panel Installation Cost After Subsidy* (Starting price of base variant) |
| 2 kWp | ~ Rs. 1,90,000 | Rs. 60,000 | ~ Rs. 1,30,000 |
| 3 kWp | ~ Rs. 2,20,000 | Rs. 78,000 | ~ Rs. 1,42,000 |
| 4 kWp | ~ Rs. 2,70,000 | Rs. 78,000 | ~ Rs. 1,92,000 |
| 5 kWp | ~ Rs. 3,15,000 | Rs. 78,000 | ~ Rs. 2,37,000 |
| 10 kWp | ~ Rs. 5,90,000 | Rs. 78,000 | ~ Rs. 5,12,000 |
*Please note: These prices are indicative as of 29th April 2025 for SolarSquare Blue 6ft variant. The final cost to install solar panels on a house depends on your city, DISCOM charges, product variant opted for, panel type, inverter type, mounting structure height, type of after-sales service, savings guarantee, roof height, etc.
Solar Panel Installation Cost in Bengaluru
Here’s a breakdown of the estimated cost to install solar panels in Bengaluru before and after a subsidy.
| Solar System Size | *What is the Cost of Installing Solar Panels Before Subsidy? (Starting price of base variant) | Solar Subsidy | Solar Panel Installation Cost After Subsidy* (Starting price of base variant) |
| 2 kWp | ~ Rs. 2,00,000 | Rs. 60,000 | ~ Rs. 1,40,000 |
| 3 kWp | ~ Rs. 2,35,000 | Rs. 78,000 | ~ Rs. 1,57,000 |
| 4 kWp | ~ Rs. 2,85,000 | Rs. 78,000 | ~ Rs. 2,07,000 |
| 5 kWp | ~ Rs. 3,70,000 | Rs. 78,000 | ~ Rs. 2,92,000 |
| 10 kWp | ~ Rs. 6,40,000 | Rs. 78,000 | ~ Rs. 5,62,000 |
*Please note: These prices are indicative as of 29th April 2025 for SolarSquare Blue 6ft variant. The final solar panel installation cost depends on your city, DISCOM charges, product variant opted for, panel type, inverter type, mounting structure height, type of after-sales service, savings guarantee, roof height, etc.
Solar Panel Installation Cost in Ahmedabad
Last but not least, let’s find out the cost of solar panel installation in Ahmedabad before and after a subsidy:
| Solar System Size | *What is the Cost of Installing Solar Panels Before Subsidy? (Starting price of base variant) | Solar Subsidy | Solar Panel Installation Cost After Subsidy* (Starting price of base variant) |
| 2 kWp | ~ Rs. 1,75,000 | Rs. 60,000 | ~ Rs. 1,15,000 |
| 3 kWp | ~ Rs. 2,05,000 | Rs. 78,000 | ~ Rs. 1,27,000 |
| 4 kWp | ~ Rs. 2,50,000 | Rs. 78,000 | ~ Rs. 1,72,000 |
| 5 kWp | ~ Rs. 2,95,000 | Rs. 78,000 | ~ Rs. 2,17,000 |
| 10 kWp | ~ Rs. 5,70,000 | Rs. 78,000 | ~ Rs. 4,92,000 |
*Please note: These prices are indicative as of 29th April 2025 for SolarSquare Blue 6ft variant. The final cost to install solar panels on a house depends on your city, DISCOM charges, product variant opted for, panel type, inverter type, mounting structure height, type of after-sales service, savings guarantee, roof height, etc.
Solar Panel Installation Cost Per kW in India
While it’s not possible to give a definitive number when it comes to the actual solar panel installation cost per kW in India, we can give you a range.
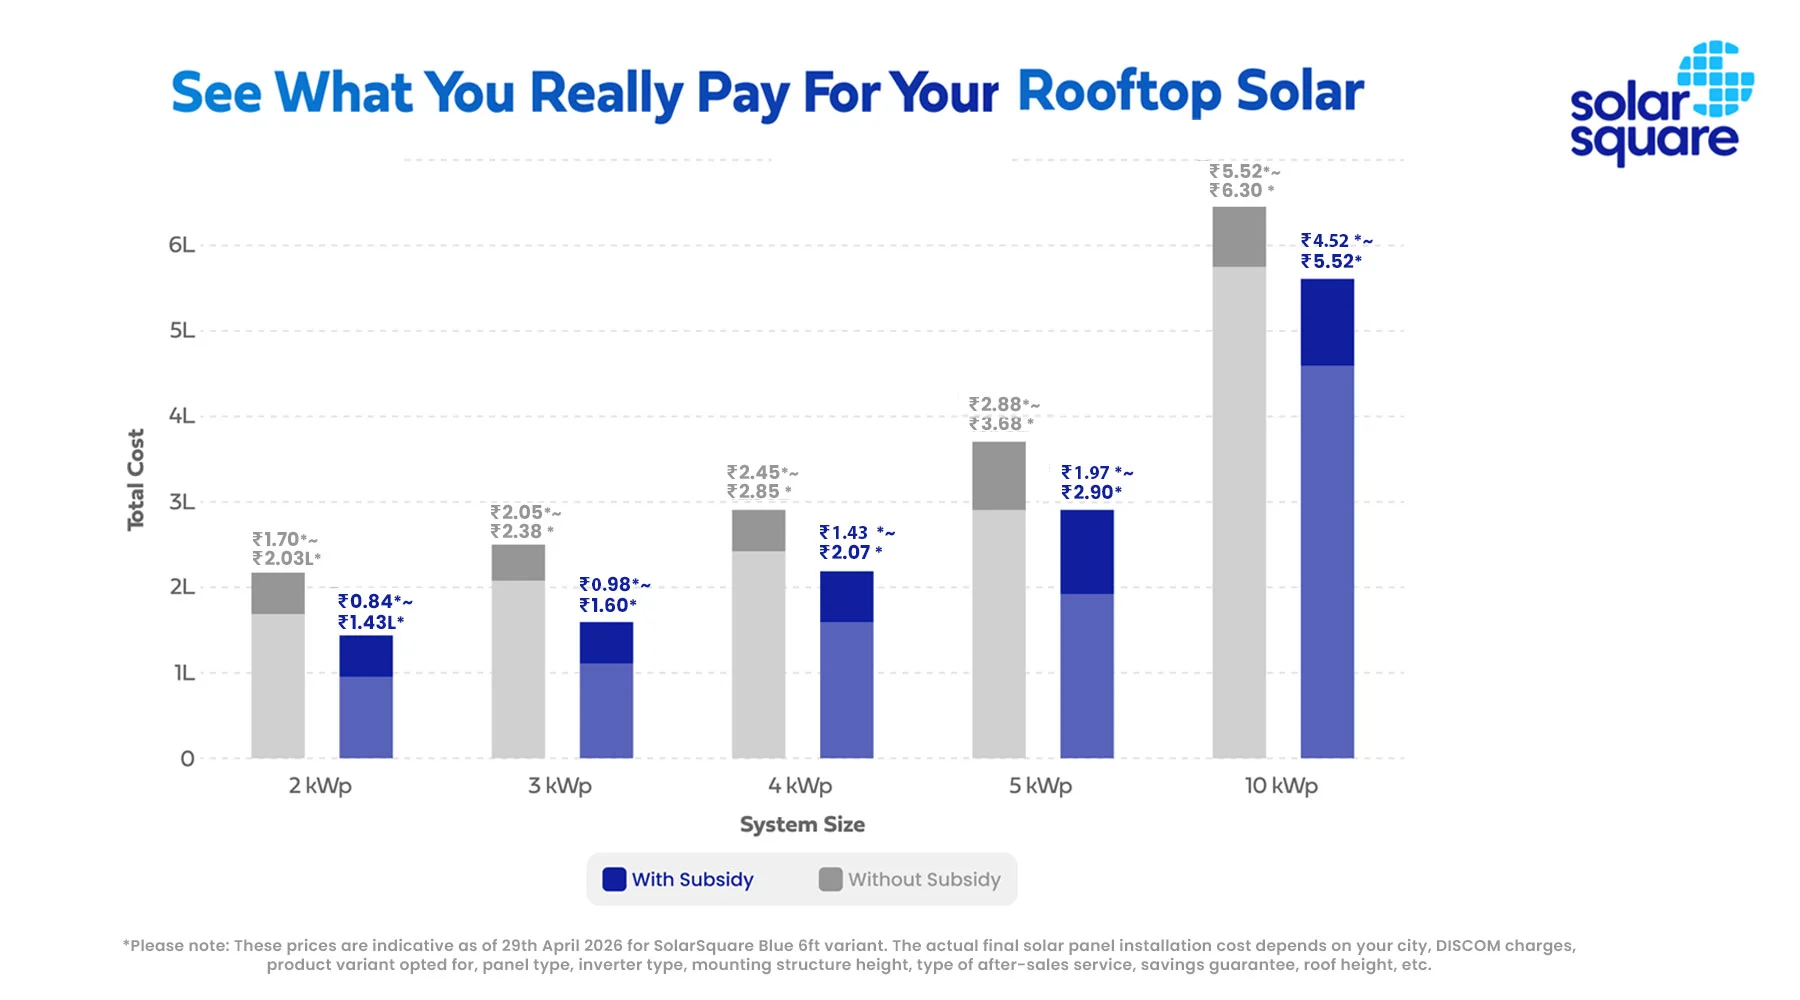
Here’s the estimated starting price for solar panel installation in India before subsidy – Base variant:
- Starting price of solar panel installation in India for a 2 kWp system (Base variant): ~ Rs. 1,75,000* to ~ Rs. 2,05,000*
- Starting price of solar panel installation in India for a 3 kWp system (Base variant): ~ Rs. 2,05,000* to ~ Rs. 2,35,000*
- Starting price of solar panel installation in India for a 4 kWp system (Base variant): ~ Rs. 2,50,000* to ~ Rs. 2,90,000*
- Starting price of solar panel installation in India for a 5 kWp system (Base variant): ~ Rs. 2,95,000* to ~ Rs. 3,70,000*
- Starting price of solar panel installation in India for a 10 kWp system (Base variant): ~ Rs. 5,70,000* to ~ Rs. 6,40,000*
*Please note: These prices are indicative as of 29th April 2025 for SolarSquare Blue 6ft variant. The actual final solar panel installation cost depends on your city, DISCOM charges, product variant opted for, panel type, inverter type, mounting structure height, type of after-sales service, savings guarantee, roof height, etc.
Here’s the estimated starting price for solar panel installation in India after a subsidy – Base variant:
- Starting price of solar panel installation in India for a 2 kWp system (Base variant): ~ Rs. 90,000* to ~ Rs. 1,45,000*
- Starting price of solar panel installation in India for a 3 kWp system (Base variant): ~ Rs. 1,02,000* to ~ Rs. 1,57,000*
- Starting price of solar panel installation in India for a 4 kWp system (Base variant): ~ Rs. 1,47,000* to ~ Rs. 2,12,000*
- Starting price of solar panel installation in India for a 5 kWp system (Base variant): ~ Rs. 1,97,000* to ~ Rs. 2,92,000*
- Starting price of solar panel installation in India for a 10 kWp system (Base variant): ~ Rs. 4,72,000* to ~ Rs. 5,62,000*
*Please note: These prices are indicative as of 29th April 2025 for SolarSquare Blue 6ft variant. The actual final solar panel installation cost in India depends on your city, DISCOM charges, product variant opted for, panel type, inverter type, mounting structure height, type of after-sales service, savings guarantee, roof height, etc.
What Are the Components of a Solar System? How Do They Affect the Solar System Installation Cost in India?
Did you know? The solar panel installation cost we’ve given so far isn’t just the cost of your panels. It is the cost of the entire solar system.
A solar system is an arrangement of different components in a specific order that aids the generation of solar power and its safe supply to run household appliances.
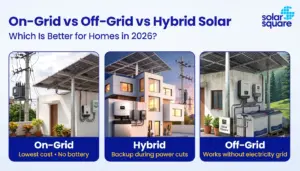
There are three main types of solar systems: on-grid, off-grid, and hybrid.
- On-grid solar panel systems are connected to the grid. They do not have batteries.
- Off-grid solar panel systems have batteries. They are not connected to the grid.
- Hybrid solar panel systems have batteries and are connected to the grid as well.
Out of all these types, it’s the on-grid solar system that’s most widely used for residential installations in India.
That said, let’s now walk you through the different components of a solar energy system. When you pay to install rooftop solar at your home, you pay for all these components (including the net metering charges):
- Solar panels
- Mounting structures
- Solar inverter
- AC and DC combiner boxes
- AC and DC cables
- Solar accessories (conduit trays or conduit pipes, earthing cables, lightning arrester, and MC4 connectors)
Let’s understand the individual role of each of these components and how they affect the overall solar panel installation cost in India.
#1. Solar Panels
Also known as solar modules, solar panels capture sunlight and transform it into an electric current, which is then converted into DC power.
They’re of the following four types:
- Polycrystalline solar panels: These are made up of multiple crystals of silicon, and their efficiency ranges between 16% and 17%.
- Monocrystalline solar panels: These are made up of one single crystal of silicon, and their efficiency ranges between 19% and 21%.
- Bifacial solar panels: These are made of mono cells on the front as well as the rear side. Hence, they’re one of the most efficient panels, which, in turn, also makes them a tad expensive. Their efficiency rate is up to 22%.
- MonoPERC Half-cut Bifacial Solar Panels: Solarsquare uses these latest technology, most efficient solar panels. Their efficiency is 22.5%. The current market rate of these panels is approximately Rs. 24/ watt.
Please note: The prices of solar panels/watt can vary from state to state.
There’s also another type i.e. the thin-film panel. Its efficiency is relatively low. Hence, it’s not very commonly used in solar systems in India.
#2. Mounting structures
The first component in line is the mounting structures. Solar panels are installed on top of them. They are categorized into two major types:
- Hot-dip galvanized steel mounting structures for an RCC rooftop
- Aluminum rail mounting structures for a metallic sheet rooftop
A 6-to 8 ft. mounting structure is usually preferred for an RCC rooftop. Elevated 6ft or 8ft structures ensure fewer shadows will fall on top of the panels.
Mounting structures should be able to withstand high wind speeds so that the panels remain unaffected by storms. Solarsquare’s prefabricated WindPro Mount™ mounting structures are the best in Class!
| Did you know? SolarSquare’s WindPro Mount™ is built to last even when cyclones hit your city and the wind speed exceeds 170 kmph! These are approved by IIT-Bombay. |
Pro Tip: Solar panels in India should be South-facing because the South direction receives the maximum sunlight. The mounting structures should offer the panels an ideal tilt angle of 10 degrees in South India. The tilt angle keeps on increasing as you move towards the North.
Needless to say, the quality of mounting structures (their tilt and height) affect the final solar panel installation cost.
#3. Solar Inverter
Without a solar inverter, your solar system will be useless; it won’t be a practical model – why? Well, that’s because it’s the solar inverter that converts DC power into alternating current (AC). Household appliances can run only on AC current.
The two most popular types of solar inverters are string inverters and micro-inverters. The latter is the latest technology and more expensive. So, the type of inverter you choose will again affect the solar system installation cost.
#4. DC and AC combiner boxes
DC cables carrying the DC current have to be isolated in a DC combiner box.
Bear in mind that the DC cables could be carrying a voltage of even 1,000 volts. Hence, isolation is mandatory. Only MC4 connectors are used for this purpose.
- AC cables carrying the AC current have to be isolated in an AC combiner box.
- This is important in order to offer the necessary protection from electrical surges.
The cable length could vary greatly depending on the height of the building. A three-story home will require more than twice the cable as a single-story home. Hence, the solar panel installation cost will vary accordingly.
#5. Solar accessories
AC and DC cables are properly fitted inside conduit pipes to transmit electric current safely. This factor again influences the cost of solar panel installation in India.
That’s not all:
- There’s a lightning arrester that should stand at a height of at least 1 meter above the panels.
- Earthing rods have to be spaced 2 to 3 meters apart.
What are the Factors that Affect the Solar Panel Installation Cost?
We’ve already explained the multiple factors. This is a memory refresher of the most critical factors that affect the cost of installing a solar panel at home:
- Project capacity
- Types of after-sales services
- City
- Length of cables used
- The type of solar panel and inverter you buy
- The type of mounting structures used
- The size of the mounting structures
- Height of the roof
- Pollution level
- Weather conditions
- DISCOM charges
What is the Scope of a Solar Installer in India?
Solar installation companies are responsible for:
- Rooftop inspection
- Locating the ideal area for the installation
- Suggesting the type and size of the module
- Suggesting the type of inverter
- Suggesting the type of mounting structure
- Solar panel installation
- Inverter wiring
- Battery wiring (if the solar system is off-grid or hybrid)
- Earthing
- Providing an annual maintenance contract (AMC)
- Providing loans and EMIs for easy solar installation
Why Choose SolarSquare?
Kyunki, mehengi bijli se muft bijli tak ka safar aasaan banaata hai, SolarSquare!
While your local vendor might offer standard 330-watt solar panels, SolarSquare offers specialized 545-watt Monoperc half-cut bifacial modules packed with more power and efficiency.
Our latest technology solar panels benefit you because:
- You get the desired system capacity with fewer panels, which consumes less space on your rooftop
- The hardware cost reduces substantially
Need more reasons on why choosing SolarSquare is a game-changer? Let’s give you six!
- You get a swift installation in just 8 hours.
- We offer a minimum 45 maintenance visits over 5 years* for deep cleaning and preventive checks.
- Our HILTI AirTight chemical anchoring protects your roof. And if a leak still appears, we offer a Rs. 1 lakh leakage-free guarantee for 1 year.
- We’re the first and only solar company in India to offer a money-back guarantee at Rs. 8 per unit if we fall short on promised generation.
- Our systems are equipped with IIT-Bombay approved cyclone-proof structures, WindPro Mount™, that can withstand up to 170 km/h wind speeds.
- Our systems use virgin-steel frames from top brands that resist rust and last 25+ years.
*Please note that since June 2026, we offer only TopCon panels in Uttar Pradesh and Nagpur, backed by 4-Year Good Zero Savings Guarantee with money-Back promise. All other terms and benefits of the GoodZero plan remain the same.
For all other states except Uttar Pradesh and Nagpur, our 5-Year Good Zero Savings Guarantee with money-Back promise continues to be available as of now.
As our product offerings (technology) and savings guarantee terms may evolve over time, please connect with your assigned Solar Consultant or schedule a FREE solar consultation with us for the latest information on available panel technologies and guarantee coverage.
Conclusion
There are many factors that affect the final solar panel installation cost. We hope our genuine initiative to guide you through all those factors helped clear your doubts.
Going solar is the need of the hour. The government also offers a subsidy on the installation of rooftop solar systems at homes. You must go solar while there’s still a chance to get financial help from the government because the subsidy offered today won’t be offered forever. So, why wait any longer? Book a free solar consultation with SolarSquare now!
Similar Reads You Might Enjoy:
- 2 kW Solar Panel Price in India With Subsidy
- 3 kW Solar Panel System Price in India
- 5 kW Solar System Price in India With and Without a Subsidy
- 10 kW Solar Panel Price in India
FAQs About Solar Panel Installation Cost In India
1. What is the cost of installing solar panels?
The exact solar panel installation cost in India depends on many factors, such as:
- Project capacity
- Types of after-sales services
- City
- Length of cables used
- Type of solar panel and inverter you buy
- The type of mounting structures used
- The size of the mounting structures
- Height of the roof
- Pollution level
- Weather conditions
- DISCOM charges
Still, to give you an idea, the starting estimated solar panel installation cost for a 5 kW solar system in India after you get a subsidy ranges between ~ Rs. 1,97,000* and ~ Rs. 2,92,000*.
*Please note: These prices are indicative as of 29th April 2025 for SolarSquare Blue 6ft variant. The final solar panel installation cost in India depends on your city, DISCOM charges, product variant opted for, panel type, inverter type, mounting structure height, type of after-sales service, savings guarantee, roof height, etc.
2. How many ACs can run in a 3 kW solar system?
A 3 kW solar system produces approximately 4,200 to 4,350 units of electricity. This capacity system can easily support one 1.5-ton AC.
3. How to install solar panels at home?
Installing solar panels at home is best left in the hands of installation experts at SolarSquare. Please register your contact details here.
Here’s how our experts approach the installation of solar panels on a rooftop:
- They carry out a rooftop inspection to find out the shadow-free area available and the type of rooftop (RCC or metallic sheet).
- They calculate the tilt angle according to the latitude of the place where you reside so that the panels receive maximum sunlight between 9 AM to 5 PM.
- They suggest the right type of solar modules (panels) and solar inverters that would be able to meet your power requirements.
- They assemble all the components to install the solar system.
- They help out with the net metering process and commissioning of the solar system.
Calculate your savings
Forecast your savings with solar on your investment on the SolarSquare’s plant
4. Which state has the lowest rate of solar panel installation?
Solar panel installation cost across all states varies. However, the cost variation is more dependent on the size of the solar system, the subsidy, the length of cables, the value-added services, the size of mounting structures, the type of inverter, and the type of module rather than a specific state or city. The final solar panel installation cost in India depends on your city, DISCOM charges, product variant opted for, panel type, inverter type, mounting structure height, type of after-sales service, savings guarantee, roof height, etc.