

 5 Reads
 18 mins


A solar installation can lose a significant amount of its potential generation because of something as simple as poor panel placement. An MNRE report on rooftop solar systems highlights that optimised panel structures can improve energy yield by up to 50%, while appropriate spacing between panel rows can reduce row-shading losses to just 2%.
Now consider Rakesh. He installed solar panels on his roof last year. The quote looked great, the installer was friendly, and the work was completed in two days. Six months later, his electricity bill had dropped, but nowhere near what he’d been promised. A water tank on the neighbouring terrace cast a shadow over a third of his solar array every afternoon. Nobody had accounted for it during the site visit.
Stories like this are common. Installing a rooftop solar system is one of the most dependable ways for an Indian household to cut its power bill, but the savings are decided long before the first panel is lifted onto the roof. They’re decided by the initial site survey, the design, the equipment, the paperwork, and the installer you pick.
The most common rooftop solar installation mistakes are choosing an unverified installer, sizing the system wrongly, ignoring shade and roof condition, using non-compliant solar equipment, installing before subsidy approval, cutting corners on wiring and safety, misunderstanding solar net metering, and neglecting rooftop solar servicing and maintenance. Each one either lowers your solar generation or can put your subsidy at risk.
This guide walks through the 10 most common rooftop solar installation mistakes, why each one eats into your savings, and what to do instead. It also covers solar tile roofs and solar roofing costs, because many homeowners get confused between them and standard rooftop panels.
The 10 Rooftop Solar Installation Mistakes at a Glance
This section covers 10 common rooftop solar installation mistakes, from choosing the wrong installer and system size to overlooking shading, roof safety, equipment quality, approvals, wiring, net metering, maintenance, and panel compatibility.
| # | Stage | Mistake | How it hurts your savings |
| 1 | Before | Hiring an unverified or inexperienced installer | Subsidy rejection, poor workmanship, no after-sales help |
| 2 | Before | Choosing the wrong system size | Paying for capacity you can’t use, or falling short on savings |
| 3 | Before | Skipping the shadow and roof layout study | Lower generation every single day |
| 4 | Before | Skipping roof strength and waterproofing checks | Leaks, repair bills, panel removal costs |
| 5 | During | Poor mounting structure, anchoring and sealing | Leaks, loose panels, rust, early repairs |
| 6 | During | Mishandled or badly placed panels | Hidden cell damage, uneven output, hard-to-clean arrays |
| 7 | During | Cheap or non-compliant equipment | Faster degradation, ineligible for subsidy |
| 8 | Electrical | Poor cabling, connections, earthing and protection | Breakdowns, fire risk, unsafe maintenance |
| 9 | Electrical | Inverter and electrical equipment in the wrong place | Overheating, power losses, early failure |
| 10 | Handover | Calling it done before approvals, testing and handover | Delayed savings, lost subsidy, no records for warranty claims |
Planning Mistakes While Installing Rooftop Solar Systems: Where Most Savings Are Won or Lost
Most of the damage in a rooftop solar installation happens at the planning stage, well before anything is bolted down.
Here are the first four installation mistakes about who you hire, how big you go, and whether your roof is actually ready.
Mistake 1: Hiring an Unverified or Inexperienced Solar Installer
Your installer decides almost everything else on this list, so it makes sense to start here.
Under the PM (Pradhan Mantri) Surya Ghar: Muft Bijli Yojana, the central subsidy is tied to installation by an MNRE- approved registered vendor on the national portal, where MNRE stands for the Ministry of New and Renewable Energy. If the vendor isn’t listed/empanelled, the commissioning paperwork may not be accepted, and the subsidy will be refused. That is a painful lesson to learn after you’ve already paid for the solar system installation.
Here’s what you must check before you hire a solar panel installer:
- Whether the vendor appears in the list of approved vendors for your area on the PM Surya Ghar national portal
- How many systems they’ve installed in your city, and whether you can speak to a past customer
- Whether the quote names the exact brand and model of panels and the solar inverter
- What happens if something breaks in year three, and who you call
- Whether they handle DISCOM (distribution company) paperwork, or leave it to you
Mistake 2: Choosing the Wrong Rooftop Solar System Size
Rooftop solar sizing sounds simple, yet it’s where a lot of homeowners either overspend or under-buy.
The right system size depends on your actual electricity use, your sanctioned load, and the shadow-free space on your roof, not just on what the installer would like to sell. A system that’s too large for your consumption can leave you with surplus units that earn far less than the units you’d have offset. A system that’s too small leaves a chunk of your bill untouched.
Here’s how to size a solar system properly:
- Pull out your last 12 months of electricity bills, not just last month’s
- Note your average monthly consumption in units (kilowatt-hours, or kWh)
- Check the sanctioned load on your connection, since your DISCOM may cap the solar capacity allowed
- Ask for a design that shows expected monthly generation, not just a kW (kilowatt) figure
- Plan for future use, such as an extra air conditioner or an electric vehicle charging, but don’t oversize by guesswork
Mistake 3: Ignoring a Proper Shadow and Roof Layout Study
Solar panels in a rooftop solar system only work as well as the sunlight that reaches them. This is the mistake that caught Rakesh.
Shadows are sneakier than they look. A water tank, a staircase headroom, a parapet wall, a mobile tower, or even a tree can cast a shadow that moves across your solar array through the day. Because panels in a string are linked, shade on a few cells can pull down output from the whole string.
What a good site survey covers:
- A shadow study across the day and, ideally, across seasons (winter shadows fall longer)
- Panel direction, with south-facing generally preferred in India
- Tilt angle suited to your latitude
- Space for cleaning access and walkways between rows
- Any planned construction next door that could cause future shading
For more details, check out our blog: What Should Be the Best Angle For A Solar Panel? Does Direction Matter?
Mistake 4: Skipping Roof Strength and Waterproofing Assessment
Panels are only as safe as the roof underneath them. A solar panel rooftop setup adds weight, wind load, and a fresh set of holes or anchors.
If your roof is old, cracked, or already leaking, putting panels over it can turn a small problem into a big one. Removing and reinstalling a whole array to repair waterproofing is expensive and eats years of savings in a single go.
SolarSquare offers sturdy WindPro Mount™ IIT-Bombay-approved mounting structures. The tapered C-channel provides strength that can withstand cyclonic winds up to 170 km/hr.
We also offer HILTI Airtight chemical anchoring when installing solar panels on rooftops. Chemical anchoring protects your roof against water leakage. We also offer a Rs. 1 lakh leakage-free guarantee for one year.
Equipment and Compliance: Solar Installation Mistakes
Once the planning is sorted, the next question is what goes on the roof. This section covers the hardware and rulebook side of a solar system on a rooftop, where a cheap shortcut can quietly cancel out your savings.
Mistake 5: Poor Mounting Structure, Anchoring, and Waterproofing Work
The mounting structure holds your panels through summer heat, monsoon winds and decades of vibration, so its quality matters more than its price tag suggests.
The problems usually come from small shortcuts. Holes drilled into the slab and left poorly sealed let water in. Mild steel hardware rusts. Bolts tightened by feel work loose in the wind, or get over-tightened and damage frames. None of it shows up on day one.
| Area | What goes wrong | What good practice looks like |
| Drilling and sealing | Unsealed or badly sealed holes lead to roof leaks | Every anchor point sealed and waterproofed properly |
| Structure type | On-site welding can damage protective coating and invite rust | Prefabricated, corrosion-protected structures assembled with bolted joints, or any weld point treated and coated afterwards |
| Nuts and bolts | Wrong or low-grade hardware corrodes and loosens | Corrosion-resistant hardware that suits the structure, with no mismatched metals |
| Tightening torque | Loose bolts shift in wind; over-tightened ones crack or deform parts | Tightened to the manufacturer’s specified torque using proper tools |
| Anchoring | Weak anchoring fails in storms | Anchoring designed for local wind load and roof type |
A simple test: ask your installer to explain how the structure is built, what it’s made of, and how each roof penetration is sealed. A confident, specific answer is a good sign.
Mistake 6: Mishandling Panels or Installing Them Incorrectly
Solar panels look tough, but the glass and the cells inside are more delicate than most people expect.
Rough handling during unloading, carrying and lifting can cause micro-cracks in the cells. You can’t see them, but they can reduce output and create hot spots over time. Panel placement matters too. Poor spacing and crooked alignment don’t just look untidy, they affect airflow, cleaning and how the array handles wind.
What to watch for on installation day:
- Panels carried by two people, held by the frame, never dragged, stacked loosely or stepped on
- Panels lifted safely to the roof, not thrown or leaned against walls
- Even gaps between panels and rows, so the frames can expand in heat and air can circulate
- Neat, level alignment with consistent tilt across the array
- Enough clearance from roof edges and a clear walkway for cleaning and inspection
- No panel left half-fixed overnight, since an unsecured panel is a wind hazard
Mistake 7: Choosing Cheap or Non-Compliant Solar Equipment
The cheapest quote usually hides the cheapest components. Panels, inverters and structures vary a lot in quality, and the difference rarely shows up in the first year.
To qualify for the central subsidy, solar modules must be domestically manufactured and, per MNRE guidance, listed under the ALMM (Approved List of Models and Manufacturers). Using non-listed modules can make an installation ineligible for subsidy.
Quality also shows up in the slow stuff: how fast panels lose output over the years, how the inverter handles heat and voltage swings, and how long the mounting structure resists rust.
Before accepting a quote, compare these five equipment specifications to understand what you’re paying for and whether the components meet the required quality and eligibility standards. Here are five key parameters to compare before choosing your solar equipment, so you don’t end up compromising on quality just to save on the upfront cost:Ask for the make and model in writing, then cross-check it yourself. A good installer won’t mind.
| What to compare | Why it matters | Where to check |
| Panel brand and model | Subsidy eligibility and long-term output | ALMM list on MNRE |
| Panel warranty | Product and performance cover differ | Warranty document, in writing |
| Inverter make and rating | Converts DC (direct current) to AC (alternating current), and failure stops everything | Datasheet and certification |
| Mounting structure material | Corrosion and wind resistance | Quote and design drawing |
| Standards and certification | Safety and reliability | Bureau of Indian Standards (BIS) |
Ask for the make and model in writing, then cross-check it yourself. A good installer won’t mind. Make sure you follow all the steps so that your application doesn’t become a reason for rejection in the PM Surya Ghar Muft Bijli Yojana application.
Electrical and Safety Mistakes in Rooftop Solar Installation
The wiring is the part of a solar system you can’t see once it’s finished, and it’s the part that can hurt people. These two mistakes deal with the cables, connections, earthing and equipment placement that keep your system safe and productive.
Mistake 8: Poor Cable Routing, Connections, Earthing, and Protection
Loose connectors, exposed cables and weak earthing are leading causes of breakdowns and, in bad cases, fires. They are also easy to get right when someone is paying attention.
- Cable routing: Use UV-resistant, properly rated DC cables and connectors, run through conduits or trays and clipped neatly. Keep them away from sharp edges, hot surfaces and spots where water collects. Loose, dangling or sun-baked cables degrade fast.
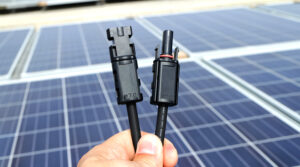
- Connectors and joints: Use matching, properly crimped connectors and don’t mix brands. A single loose connection can heat up under load, and that heat is a fire risk.
- Earthing and protection: The array, structure and inverter should be earthed properly, with a lightning arrestor where the building calls for it and surge protection devices (SPDs) on both the DC and AC sides. Earthing should be built to applicable norms, not improvised by tying into an old household earth.
- Emergency isolation and access: There should be clearly labelled isolators and breakers that let someone shut the system down quickly, and a safe, unobstructed route to the roof for maintenance or an emergency.
For technical safety requirements, installers work under norms from the Central Electricity Authority (CEA) and relevant BIS standards. Ask your installer to explain their earthing and protection setup in plain words. If they can’t, treat that as information.
Mistake 9: Installing the Inverter or Electrical Equipment in the Wrong Location
The inverter is the brain of your system, and where it sits affects how long it lasts and how much power you lose.
An inverter fixed in direct sun, a stuffy corner or a damp spot runs hot and can cut its output to protect itself. A long cable run between the array, inverter and DB (distribution board) wastes energy and adds cost. Equipment tucked away where no one can reach it makes servicing difficult and slows down any emergency shutdown.
What good placement looks like:
- Shaded, well-ventilated and protected from rain, dust and water splash
- Close enough to the array and the DB to keep cable runs short
- Easy to reach for servicing, with clear space around it
- The distribution board and isolators accessible, labelled and protected from the weather
- Away from storage, flammable material and places people don’t normally go
Approval, Commissioning, and Handover Mistakes
A system that works perfectly but isn’t properly approved, tested and documented won’t save you a rupee, or protect your subsidy. This last mistake covers the stage that many people treat as a formality.
Mistake 10: Treating Installation as Complete Before Approvals, Testing, and Handover
The panels being on the roof doesn’t mean the job is done. Approvals, commissioning tests and a proper handover are what turn hardware into savings.
- Approvals come first: The subsidy process follows a sequence, and skipping ahead can cost you the benefit. The usual flow on the national portal looks like this:
- Register on the portal with your state, DISCOM and consumer number
- Apply for rooftop solar and wait for feasibility approval
- Choose a vendor from the approved list
- Get the system installed
- The vendor applies for net metering with your DISCOM
- Inspection and commissioning take place
- The commissioning report is uploaded, and the subsidy is released to your bank account
The common error is installing first and applying later. Always get the go-ahead before work starts, and keep copies of every acknowledgement. For current steps and timelines, follow the PM Surya Ghar portal directly, since processes get updated.
- Net metering decides when savings start: Net metering is how your solar generation turns into bill savings. Get this wrong, and your rooftop solar installation can run fine while your bill barely moves. Your savings don’t begin until the meter is live. The Ministry of Power publishes the national framework on consumer rights for rooftop solar.
- Testing and commissioning. Before sign-off, a competent engineer should test the system, covering checks such as polarity, insulation, earth continuity, voltage readings and how the inverter behaves when it syncs with the grid. Ask to see the results, and watch the system generate on the day.
- Handover: Walk away with the paperwork, not just the keys. A proper handover includes:
- The commissioning certificate and approval acknowledgements
- Warranty documents for panels, inverter and workmanship
- Panel and inverter serial numbers, plus the system layout and wiring diagram
- Access to the monitoring app and a quick demo of how to read it
- A cleaning and maintenance guide, with the service contact
That last point matters more than it sounds. Dust, bird droppings and pollution build up fast in most Indian cities, and without monitoring you may never notice that a fault cut your generation for weeks. Clean panels regularly with soft water and a soft cloth when they’re cool, and compare your monthly generation with what you were told to expect.
H2: What Happens After Rooftop Solar Installation?
Installation is only the first step. Regular monitoring and maintenance help your system generate electricity efficiently and prevent small issues from affecting long-term savings.
Here are five things to keep in mind:
- Monitor output: Check your inverter or monitoring app regularly to track daily generation.
- Identify abnormal generation: Look for unexpected drops in output that may indicate shading, dirt, or equipment faults.
- Clean panels when required: Set cleaning frequency based on local dust levels, rainfall, and site conditions.
- Inspect system components: Periodically check wiring, mounting structures, and earthing for damage, loose connections, or corrosion.
- Use after-sales support: Contact your installer when you notice recurring faults or need professional inspection and repairs.
H2: Solar Tile Roofs and Solar Roofing Cost: What Homeowners Should Know
If you’ve been researching, you’ve probably come across solar tile roofs and wondered whether they replace standard panels. They’re a different product with a different use case, so this section clears up the difference and explains how to compare costs fairly.
Solar Tile Roofs vs Standard Rooftop Panels
Standard rooftop systems mount panels on a structure above your existing roof. Solar tiles and shingles are a form of BIPV (building-integrated photovoltaics), where the solar cells become the roofing material itself.
Solar tile roofs look sleek and make sense in some situations, such as a new build or a full re-roofing project where you’d be buying roofing material anyway. In India they remain a niche, premium option with fewer suppliers. Subsidy support is built around standard grid-connected rooftop systems, so check eligibility with the portal before assuming a solar tile roof qualifies.
| Factor | Standard rooftop solar panels | Solar tile roofs (BIPV) |
| How it’s fitted | Mounted on a structure over the existing roof | Replaces part of the roof covering |
| Upfront cost per kW | Lower, mainstream product | Higher, premium product |
| Suitable for | Existing homes, societies, businesses | New builds or full re-roofing |
| Availability in India | Wide, many installers | Limited suppliers |
| Subsidy fit | Designed around this format | Verify eligibility first |
| Repairs | Panels can be removed and refitted | More complex, tied to the roof |
For an existing home with a sound roof, a standard solar panel in rooftop setup is usually the more practical and cost-effective route.
Solar Roofing Cost: How to Compare Quotes Fairly
Solar roofing cost is only meaningful when you know exactly what’s included. A tile quote may bundle roofing material, while a panel quote may not include the structure, cabling or meter charges.
Ask every installer for an itemised, written breakdown covering materials, structure, installation, electrical work, meter and paperwork. Costs change often with equipment prices and policy updates, so verify current rates with your installer and the official portal before deciding.
Final Thoughts: Good Solar Is Mostly Good Decisions
Rooftop solar rewards homeowners who make careful decisions before installation day. Almost every mistake in this guide is avoidable with a little homework: verify your installer, size the system honestly, study the shade, check the roof, read the equipment list, follow the approval sequence, and don’t ignore the system after it’s up.
If you’d like a second pair of eyes on your plan, SolarSquare can help you do it properly from the start.
At SolarSquare, we handle the survey, design, equipment selection, DISCOM paperwork, and subsidy process so you don’t have to figure it out alone. Book a free site assessment with SolarSquare and get a system designed around your roof and your electricity bill.
Frequently Asked Questions
Can I install solar panels on any roof?
No, not every roof is ready. The roof must be structurally sound, reasonably free of shade, and, ideally, not due for replacement soon. Old or leaking roofs should be repaired first, since removing panels later adds cost.
Do I lose the PM Surya Ghar subsidy if I use an unregistered vendor?
Yes. The subsidy is linked to installation by a vendor registered on the national portal and to approved equipment. Using a vendor who isn’t registered, or equipment that doesn’t meet the rules, can lead to the subsidy being refused. Confirm vendor status on the official portal before paying.
Does rooftop solar need maintenance?
Yes, rooftop solar does need regular maintenance service. Regular cleaning, a check of inverter readings, and an occasional inspection of connections and structure keep output steady. Skipping this slowly cuts your savings without any visible sign.
How long do rooftop solar panels last?
Panels are typically expected to last around 25 years, with output declining gradually over time. Actual performance depends on equipment quality, installation, and upkeep, so check the warranty terms carefully.


 Previous Article
 36 min